What is the need of Entity Framework?
Let me explain in simple words.The software application that we write using object oriented languages such as C#, java deals everything in terms of objects. It has got its own standards for managing object oriented data. However, when it comes to data storage we use relational data and RDMS systems. So application layer and database layer has got two different standards for managing data. If a domain object from application layer needs be persisted as relational data then we need a mapper to convert domain object to relational data. Otherwise developers end up in writing lot of code to do this conversion. This is where entity framework plays a vital role.What is Entity Framework?
It is a object relational mapper that allows us to interact with relational data using domain specific objects. It creates abstraction layer and exposes data only through domain objects and hides complexity of transforming and saving data behind the scene.Advantages of Entity Framework
Avoids impedance mismatch
The framework creates abstraction over relation data contained in database and exposes data through domain specific objects. So developer can write code that deals with only domain specific objects and framework will take care of transforming these objects to relational data.Less impact on changing underlying data provider
If we change the source of relational data i.e. we change our data provider, then there will not be any impact on the application.Code Resuse
We can reuse the functionality which EF provides without need of duplicating same piece code.Application maintainability
As application relies on the fully tested framework for managing data, it is easy to maintain the application against the changes. Even if there is any database schema change, it can be handled via minor refactoring.Having said that there are some disadvantages too, let us get to know about that.
Disadvantages of Entity Framework
The developer who writes linq query to read data from database should have enough knowledge on type of SQL query that gets generated. This becomes more evident when you write linq queries to access data from multiple table. In this case query generated might be chatty, which makes repeated calls to database rather getting data on single go. These kind of queries leads in to performance issue on production servers where latency is more.So we have understood the basics of EF, Now let us kick start the development part of it. We will develop a employee management application using EF6.
Building data access layer
EF supports three different types of application developmentCode First
In this approach designer will create POCO object classes ( classes with getters and setters) ,which will be transformed in to equivalent database tables.Model First
In this approach, model will be designed initially and then this will be transformed into database design.Database First
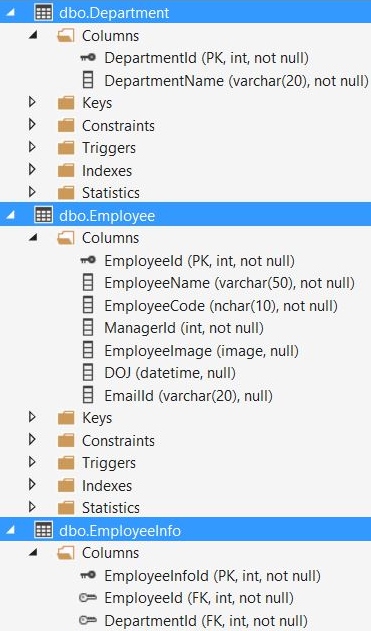
Database will be designed first and EF will generate equivalent entity classes in C#We will be using database first approach here. so let us go ahead design the database. As we are building this application for understanding the basic concepts, I have kept design simple containing only 3 tables.
Database design
Design looks simple and self explanatory.

Setting up the Project
Fire up visual studio and create asp.net web application and select the template as mvc. Let us name it as EMS.
Now we need to build data access layer. Before that make sure that you have latest version of entity framework installed. if not, it can be done by executing following command in package manager console of visual studio.

Step 1: We need to add ADO.net entity data model. Let us name it as : EMSContext.

Step2: Select the first option which is database first approach.

Step3: Enter database server name and database name : EMS

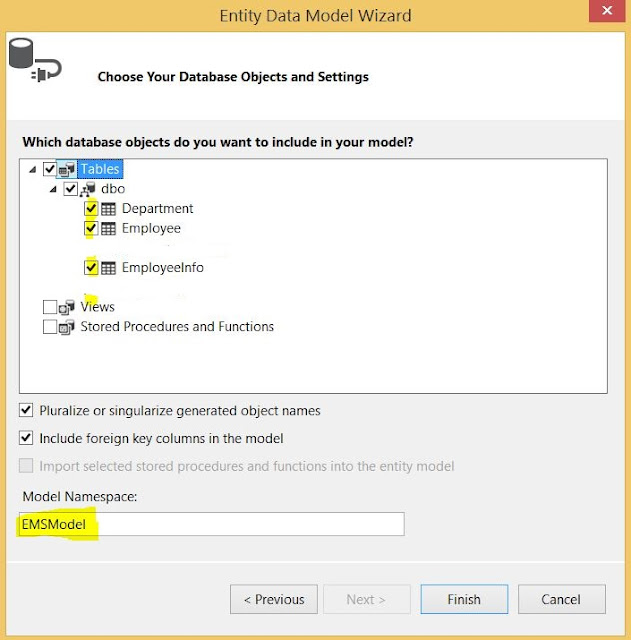
Step4: Select database objects.

The entire process builds following entities for us. Note that each entity mapped to physical database tables. We will perform operations (create, update etc) on these entities (domain objects) and EF will take care of saving it to database.

Implementing Model View Controller
OK Great!. This builds data access layer. The dal layer contains a useful class: EMSEntities that is derived from a framework class know as DBContext. This provides us a easy way of querying the data from database using linq. Isn't that simple? Let see how we can edit, create and update employee data.
public partial class EMSEntities : DbContext
{
public EMSEntities()
: base("name=EMSEntities")
{
}
protected override void OnModelCreating(DbModelBuilder modelBuilder)
{
throw new UnintentionalCodeFirstException();
}
public virtual DbSet<Department> Departments{get; set;}
public virtual DbSet<Employee> Employees{get; set;}
public virtual DbSet<EmployeeInfo> EmployeeInfoes{get; set;}
}
|
Building controller with action methods
- Create controller - EmployeeController
- Define action methods to perform data access and manipulation.
- Index () - Method returns list of all employees. This is the default method that gets called when controller is loaded. "EmsEntities" class facilitates querying database using linq. The linq query returns collection of employee entity
, which we need to convert to collection of EmployeeViewModel IEnumerableusing ConvertToModel method. This conversion is required as view expects model of type : of EmployeeViewModel.
- Create() - Method gets called when Create View gets loaded. It supplies required data to view through model.
- Create(EmployeeViewModel evm) - Calls ConvertToEntity. This converts employee model to employee entity. This conversion is required since EF performs save operation only on entities. Post conversion, employee information will be saved in to the database
- Edit(int id) - Gets invoked when edit view is loaded. This method gets employee information from database for specified id (passed as input parameter) and updates view.
- Edit (EmployeeViewModel evm) - Saves modified employee information to database.
public class EmployeeController : Controller
{
// GET: Employee
private EMSEntities emsEntity=new EMSEntities();
public ActionResult Index()
{
var employees=emsEntity.Employees.ToList();
var employeesModel=ConvertToModel(employees);
return View(employeesModel);
}
// GET: Employee/Create
public ActionResult Create()
{
EmployeeViewModel vm=new EmployeeViewModel();
vm.Departments=GetDepartments();
return View(vm);
}
// POST: Employee/Create
[HttpPost]
public ActionResult Create(EmployeeViewModel evm)
{
try
{
if (ModelState.IsValid)
{
var employee=this.ConvertToEntity(evm);
emsEntity.Employees.Add(employee);
emsEntity.SaveChanges();
return RedirectToAction("Index");
}
else
return View(employeeViewModel);
}
catch
{
return View();
}
}
// GET: Employee/Edit/5
public ActionResult Edit(int id)
{
var employee=emsEntity.Employees.Where(i=> i.EmployeeId==id).ToList();
EmployeeViewModel empViewModel=ConvertToModel(employee).FirstOrDefault();
empViewModel.Departments=GetDepartments();
return View(empViewModel);
}
private List<DepartmentModel> GetDepartments()
{
var departmentList=emsEntity.Departments.ToList();
var departmentModels=new List<DepartmentModel>();
foreach (var department in departmentList)
{
departmentModels.Add(new DepartmentModel(){DepartmentId=department.DepartmentId, DepartmentName=department.DepartmentName});
}
return departmentModels;
}
// POST: Employee/Edit/5
[HttpPost]
public ActionResult Edit(EmployeeViewModel evm)
{
try
{
if (ModelState.IsValid)
{
var employee=this.ConvertToEntity(evm);
emsEntity.Employees.Attach(employee);
emsEntity.Entry(employee).State=EntityState.Modified;
emsEntity.EmployeeInfoes.Attach(employee.EmployeeInfoes.FirstOrDefault());
emsEntity.Entry(employee.EmployeeInfoes.FirstOrDefault()).State=EntityState.Modified;
emsEntity.SaveChanges();
return RedirectToAction("Index");
}
else
{
ViewBag.ErrorMessage="There was failure in processing request";
return View();
}
}
catch (Exception ex)
{
return View();
}
}
private Employee ConvertToEntity(EmployeeViewModel empViewModel) { Employee employee=new Employee(); employee.EmployeeId=empViewModel.Employee.Id; employee.ManagerId=empViewModel.Employee.Id; employee.EmployeeName=empViewModel.Employee.Name; employee.DOJ=empViewModel.Employee.DOJ; employee.EmployeeCode=empViewModel.Employee.Code; employee.EmailId=empViewModel.Employee.Email; employee.EmployeeInfoes=new List employee.EmployeeInfoes.Add(new EmployeeInfo() { EmployeeId=empViewModel.Employee.Id, DepartmentId=empViewModel.Employee.DepartmentId, EmployeeInfoId=empViewModel.Employee.EmployeeInfoId }); return employee; } private static EmployeeViewModel ConvertToModel(Employee emp) { EmployeeViewModel employeeModel=new EmployeeViewModel(); employeeModel.Employee=new EmployeeModel(); employeeModel.Employee.Id=emp.EmployeeId; employeeModel.Employee.Code=emp.EmployeeCode; employeeModel.Employee.Name=emp.EmployeeName; if (emp.EmployeeInfoes.FirstOrDefault()!=null) { employeeModel.Employee.DepartmentName=emp.EmployeeInfoes.FirstOrDefault().Department.DepartmentName; employeeModel.Employee.DepartmentId=emp.EmployeeInfoes.FirstOrDefault().Department.DepartmentId; employeeModel.Employee.EmployeeInfoId=emp.EmployeeInfoes.FirstOrDefault().EmployeeInfoId; } employeeModel.Employee.DOJ=emp.DOJ.HasValue ? emp.DOJ : null; employeeModel.Employee.Email=emp.EmailId; return employeeModel; }
}
|
Creating view for creating and updating employee
Index- Displays list of all employees in the grid format.This view is bound to EmployeeViewModel. Any changes to the model will be reflected in the view and vice versa is also holds good.
@model IEnumerable
@using PagedList.Mvc;
@{
ViewBag.Title="Index";
Layout="~/Views/Shared/_Layout.cshtml";
}
<h2>Employee Details</h2>
<div class="datagrid">
<table cellpadding="1" cellspacing="1" border="1">
<thead>
<th>Name</th>
<th>Code</th>
<th>Department</th>
<th>Date of Joining</th>
<th>Email</th>
<th>Action</th>
</thead>
<tbody>
@foreach (var emp in Model)
{
<tr>
<td> @emp.Employee.Name</td>
<td>@emp.Employee.Code</td>
<td>@emp.Employee.DepartmentName</td>
@if (emp.Employee.DOJ.HasValue)
{
<td>@emp.Employee.DOJ.Value.Date.ToShortDateString() </td>
}
else
{
<td>@emp.Employee.DOJ.GetValueOrDefault()</td>
}
<td>@emp.Employee.Email</td>
<td>
@Html.ActionLink("Edit", "Edit", new{id=@emp.Employee.Id})
@*@Html.ActionLink("Delete", "Delete", new{id=@emp.Employee.Id})*@
</td>
</tr>
}
<tr><td colspan="5"> @Html.ActionLink("Create", "Create")</td></tr>
</tbody>
</table>
</div>
|
Edit view - Allows us to edit an existing employee information.
@model EMS.Models.EmployeeViewModel
@{
ViewBag.Title="Edit";
Layout="~/Views/Shared/_Layout.cshtml";
}
<h2>Edit Employee</h2>
@using(Html.BeginForm("Edit","Employee",null,FormMethod.Post,null))
{
<table>
<tr><td colspan="2">@Html.ValidationSummary()</td></tr>
<tr><td>@ViewBag.ErrorMessage</td></tr>
<tr><td></td><td>@Html.HiddenFor(m=> m.Employee.Id)</td></tr>
<tr><td></td><td>@Html.HiddenFor(m=> m.Employee.EmployeeInfoId)</td></tr>
<tr><td>@Html.DisplayNameFor(m=> m.Employee.Name)</td><td>@Html.EditorFor(m=> m.Employee.Name)</td></tr>
<tr><td>@Html.DisplayNameFor(m=> m.Employee.Email)</td><td>@Html.EditorFor(m=> m.Employee.Email)</td></tr>
<tr><td>@Html.DisplayNameFor(m=> m.Employee.DOJ)</td><td>@Html.EditorFor(m=> m.Employee.DOJ)</td></tr>
<tr><td>@Html.DisplayNameFor(m=> m.Employee.Code)</td><td>@Html.EditorFor(m=> m.Employee.Code)</td></tr>
<tr><td>@Html.DisplayNameFor(m=> m.Employee.DepartmentName)</td><td>@Html.DropDownListFor(m=> m.Employee.DepartmentId, new SelectList(Model.Departments, "DepartmentId", "DepartmentName"))</td></tr>
<tr><td><input type="submit"/></td></tr>
<tr><td></td></tr>
</table>
|
Create View - Allows us to create a new employee
@model EMS.Models.EmployeeViewModel
@{
ViewBag.Title="Create";
Layout="~/Views/Shared/_Layout.cshtml";
}
<h2>Create Employee</h2>
@using (Html.BeginForm("Create", "Employee", null, FormMethod.Post, null))
{
<table cellpadding="2" cellspacing="2">
<tr><td colspan="2">@Html.ValidationSummary()</td></tr>
<tr><td>@Html.DisplayNameFor(m=> m.Employee.Name)</td><td>@Html.EditorFor(m=> m.Employee.Name)</td></tr>
<tr><td>@Html.DisplayNameFor(m=> m.Employee.Email)</td><td>@Html.EditorFor(m=> m.Employee.Email)</td></tr>
<tr><td>@Html.DisplayNameFor(m=> m.Employee.DOJ)</td><td>@Html.EditorFor(m=> m.Employee.DOJ)</td></tr>
<tr><td>@Html.DisplayNameFor(m=> m.Employee.Code)</td><td>@Html.EditorFor(m=> m.Employee.Code)</td></tr>
<tr><td>@Html.DisplayNameFor(m=> m.Employee.DepartmentName)</td><td>@Html.DropDownListFor(m=> m.Employee.DepartmentId, new SelectList(Model.Departments, "DepartmentId", "DepartmentName"))</td></tr>
<tr><td><input type="submit" /></td></tr>
<tr><td></td></tr>
</table>
}
|
Validating the application
Let us run EMS app and see if all looks good. As designed, application shows all employees in grid format with links to create and edit employees.
Clicking on create link will navigate us to create view for creating a new employee.
Clicking edit link loads selected employee in edit view, which allows to update employee information.
Conclusion
In this article, I showed how we can create a simple employee management system using mvc and entity framework. I hope it was useful for you to understand the basic concepts. Please share your comments and let me know if any queries.
Happy coding,
MK.


No comments:
Post a Comment